![How To Apply Thermal Paste? [2024]](https://www.ingameloop.com/wp-content/uploads/How-to-Apply-Thermal-Paste-450x257.jpg)
A CPU, or processor, is the brain of a computer that performs computing-related tasks and supervises every ins and out of a system. But we often notice a sudden increase in PC temperature due to CPU overheating. For your information, CPU temperature fluctuates due to numerous tasks, especially during load-intensive operations. You must remember that high temperatures can seriously damage your processor and sometimes your computer’s motherboard. Well, a good-quality thermal paste together with an effective CPU cooler can help us in such a situation.
The thermal paste is an inductive substance used to amplify the heat dissipation of the processor. In simplest terms, the thermal paste helps the CPU to pass on its heat to the CPU cooler, so there must be an ideal temperature. But you must know how to apply thermal paste for all the temperature-related advantages. Well, the process of thermal paste application is pretty easy. All you have to do is carefully follow a simple set of rules or, you may say, steps to get ideal results. Read this post until the end to know everything related to thermal paste application.
What tools do you need to apply thermal paste?
Before heading into applying thermal paste, there are some tools that you need for your job. In this section, I’m giving the names of all the necessary equipment together with their operation. Those include
| Tools | Why do we need them? |
| Thermal paste | First and the most important item you need in the whole process is the thermal paste. If you’re building a top-tier PC for extreme gaming or content creation, go for a paste composed of silver, copper, or ceramic. In contrast, a silicon- or zinc oxide-based thermal paste is adequate for basic usage. |
| Spudger | Spudger is a plastic-made tool with a screwdriver-like flat head that is used to feel off the thermal paste from the CPU or heat sink. You will lately know that we use it to remove the older dried thermal paste before applying a new one. |
| Lint-free cloth | A Lint-free cloth is also used to remove the remaining thermal paste that is still there even after using the spudger. We can’t use any cloth except lint-free ones since these will leave some particles on the CPU that may affect the heat dissipation being a bad thermal conductor. |
| Isopropyl alcohol | We will use the lint-free cloth after wetting it with the isopropyl alcohol. This helps us to easily remove the thermal paste from the metal surfaces like the heat sink or CPU surface. Moreover, it’s very quick in evaporation, so it will automatically disappear from the surface after a few minutes. |
| Piece of plastic | A piece of plastic could be a saran wrap or sandwich bag. We will use it to apply the thermal paste since a bare finger may add some residues or body oil to the thermal paste. |
Some precautions before applying thermal paste
Since we are dealing with one of the most crucial and sensitive computer components, the CPU, we must take care of a few precautions. Those include
- Avoid touching the surfaces of the CPU, CPU socket, and cooler’s heat sink to keep any types of impurities away. If you touch any of the above-mentioned items, you may leave your body oils or other residues on the surface. In this way, you may affect the overall thermal conduciveness of the components.
- Don’t apply too much of the thermal paste. Instead, use only a tiny portion to save from short circuits, overheating, or dirty CPU when using. You must read this post until the end to better understand what I’m saying.
- The thermal paste is applied only on the top side of the CPU, not on the heat sink or cooler’s bottom. If you’re thinking about using it on both the CPU and heat sink, you will create some mess as we mentioned in the above precaution. You must read the following section for a better understanding.
How to Apply Thermal Paste?
1. Prepare the CPU and heat sink surfaces.
First, you must prepare the surfaces of both the CPU and heat sink to apply the thermal paste. But there could be two possibilities for cleaning, and you have either a brand-new CPU and heat sink or older ones already with some dried or pre-applied thermal paste on. Therefore, we are dividing this cleaning section into two parts or cases. In the first case, we will look at cleaning the surfaces of the new components. But in the second case, we will look at the preparation process of the older processor and heatsink.
Case 1: there is a new CPU and heat sink. If you have purchased a new processor or heat sink, the process of preparing these for thermal paste is quite to the point. You have to do only a few things:
- Wet the lint-free cloth in the isopropyl alcohol and start cleaning the surfaces of the new CPU and heat sink. This helps to wipe out any dust particles or other tiny substances from the surfaces to give better heat dissipation or thermal conductivity.
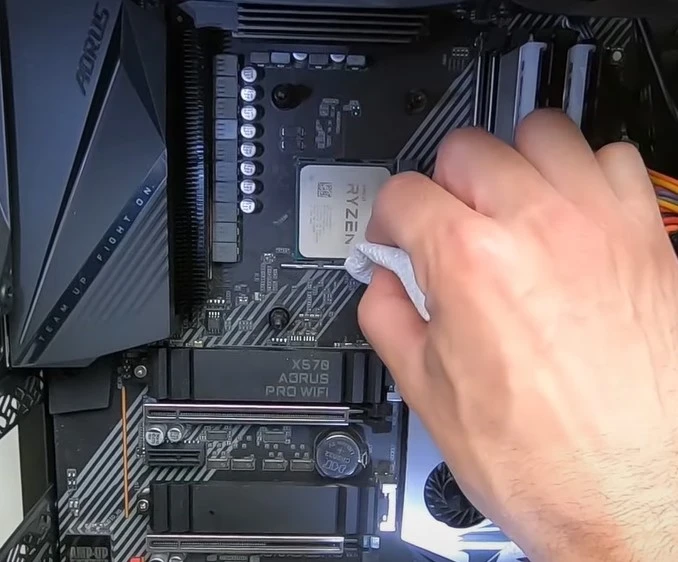
- After completing the above cleaning process, take a dry piece of cloth and gently rub the surfaces to ensure or double-check the cleaning process.
- Make sure not to touch your bare hands to the surface, as I mentioned in the precautions. Additionally, take care of the cleaned surfaces until they dry by not letting any dust or debris get on the surface.
Case 2: you have an older CPU and heatsink: In the case of the older components, there must be some thermal paste dried on the surfaces. Therefore, the process of cleaning would be different than in case 1. The steps, in this case, include
- You have to start by scratching the dried thermal paste from the surfaces of the CPU and heatsink using the flat tip of the spudger. Make sure to keep it as gentle as possible so as not to damage the CPU surface.
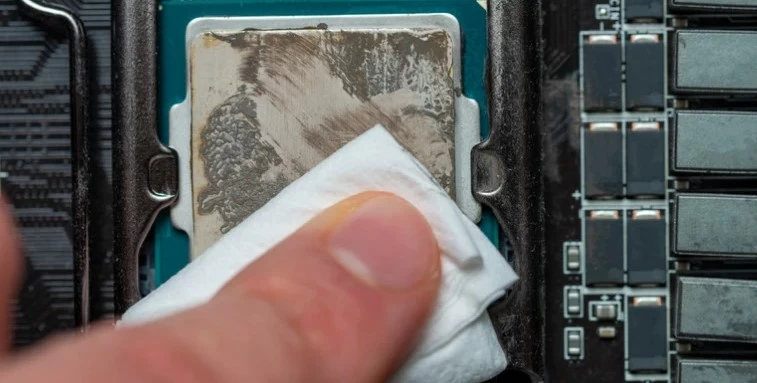
Note: Up to this, you would have removed most of the dried thermal paste from the surfaces. Now, it’s time to remove the remaining thermal paste portion using the lint-free cloth and isopropyl alcohol.
- Dip a clean piece of cloth into the alcohol, and repeat the same process that is given in case 1. Gently rub the surface to remove the remaining thermal paste, clean using a dry and fresh lint-free clock, and then let the surfaces dry for a while.
2. Apply the thermal paste
After cleaning the thermal paste from both the CPU’s top surface and the heat sink or bottom of the CPU cooler, it’s time to actually apply the thermal paste. For your information, this step is the same whether you have purchased a new CPU and cooler or had the same older components that you have just cleaned. In addition, Follow all the steps given below to apply a new thermal paste.
- Put a small amount of thermal paste (about the size of a pea or a rice grain—not too much) on the top CPU surface. Remember, many enthusiasts use different ways to put the paste on the surface, but I use the dot method—just put a tiny amount without following any pattern.
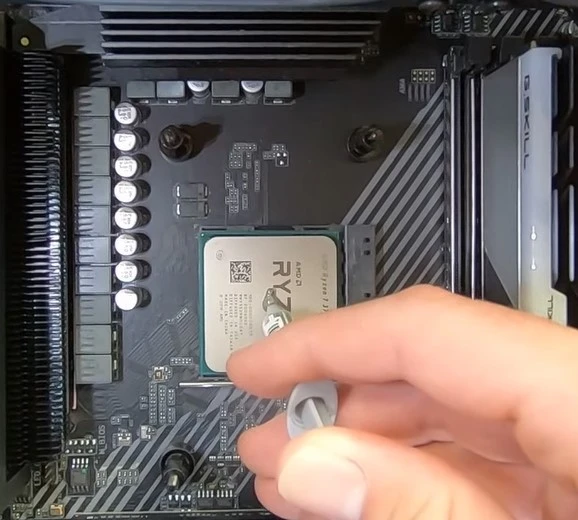
- If you have put a pea-sized paste on the CPU surface, wear the plastic piece on your finger. Gently spread the thermal paste on the whole surface using your finger.
- Now, it’s time to install the cooler on the processor. For this, take the cooler and slowly place it on its socket. Remember, try to keep it as horizontal as possible—don’t tilt it on one side.
Note: Do not apply the paste on the cooler’s bottom surface when you have already applied it on the CPU. If you do so, you will end up putting too much thermal paste, which may cause several issues on the motherboard.
What if a cooler already pre-applied has thermal paste?
We all know that most CPUs need a thermal solution to improve their performance, but installing a CPU cooler in a PC is quite tricky. All CPU coolers require thermal paste, and some CPU coolers come pre-applied with thermal paste for easy installation. Check your CPU cooler water block or baseplate to ensure the thermal paste has been pre-applied or not. If you have the silver paste in there, you don’t need to apply thermal paste again when installing the processor.
The process of setting up a cooler pre-applied with the processor is quite easy. You neither have to invest in a thermal paste, not to other equipment that is required to safely complete the process. All you have to do is to follow this process.
- First of all, if there is some thermal paste dried on the CPU, clean it off using the same steps as we read in the above section. Even if there is no paste dried on the CPU, still, you have to follow the same process to clean dust and other residues. Those include wetting the lint-free cloth in isopropyl alcohol, gently cleaning the CPU surface, cleaning with a dry cloth, and letting it dry.
- Now, it’s time to install the CPU cooler on the CPU that had pre-applied thermal paste on it. For this, take the cooler and slowly place it on its socket. Remember, try to keep it as horizontal as possible—don’t tilt it on one side.
Conclusion
In most cases, there is no need to change the thermal paste for years. However, when the cooler is removed, the thermal paste must be reapplied. Also, if the CPU temperature is getting unusually high, the thermal paste should be replaced to improve heat transfer. But, if you’re not sure about how to apply thermal paste, you can take help from this post. We have discussed several terms and conditions together with many variations in the method of applying thermal paste in this article. You must take all the precautionary steps and follow the exact method for better results.
Let me sum up the whole post in this one paragraph. You have to start by collecting all the necessary equipment that is required to apply the paste, including thermal paste, tint-free cloth, alcohol, a spudger, and a piece of plastic. After that, remove all the dried-out pre-applied paste from the cooler and CPU unless both aren’t brand-new. If you have done this, take a pea-sized amount of thermal paste, put it on the CPU surface, spread it all around the surface, and finally, carefully install the CPU cooler on the processor. You can read this method in detail in the above section.
Frequently Asked Questions
What if you have applied thermal paste in the wrong way?
If you have misapplied the thermal paste, air bubbles may form in the thermal paste, affecting its thermal conductivity. Re-applying the thermal paste may cause new air bubbles to form. If you encounter problems during installation, please remove the CPU cooler. Now remove all paste and start the process again. For long-term use, apply thermal paste properly and install a CPU cooler.
How to purchase a thermal paste?
First of all, you have to decide your usage since you need to determine how efficient thermal paste you really need. After that, check the thermal conductivity and density of the compound. In addition, you must remember that the silver, copper, or ceramic paste is perfect for top-tier usage. In contrast, a silicon- or zinc oxide-based thermal paste is adequate for primary use.

Tech Hardware Expert
A graduate in Computer Engineering from the prestigious NUST, Atif Liaquat possesses an innate passion for computer technology that dates back to his childhood days of experimenting with hardware and software. In the past six years, he has parlayed this passion into a successful writing career, delivering a wealth of knowledge to his readers with his unique blend of technical expertise and clear, engaging prose. His rare ability to demystify complex tech concepts for a broad audience distinguishes him in the industry. Atif's insightful and educational content continuously piques the curiosity of readers, cementing his position as an invaluable voice in the tech world.![How Many Hertz (Hz) is Good for Gaming? [Guide 2024]](https://www.ingameloop.com/wp-content/uploads/How-Many-Hz-is-Good-for-Gaming-450x210.jpg.webp)

![How To Fix Error Code 103 On Roblox Xbox One? [Solved 2024]](https://www.ingameloop.com/wp-content/uploads/How-To-Fix-Error-Code-103-On-Roblox-Xbox-One-450x210.jpg.webp)
![Does Gaming Monitors have Speakers? Explained! [2024]](https://www.ingameloop.com/wp-content/uploads/Does-Gaming-Monitors-have-Speaker-450x210.jpg.webp)

