![How to Change CPU Fan Speed Without BIOS? [2024]](https://www.ingameloop.com/wp-content/uploads/How-to-Change-CPU-Fan-Speed-without-BIOS-450x257.jpg)
There are certain criteria when changing the speed of the CPU fan is very impactful and beneficial. For instance, if you are experiencing your CPU overheating, you have to increase the fan speed to keep the system stable. On the flip side, it can also happen that your fans run at full speed without any apparent reason producing an unbearable amount of noise. In all such conditions, you have to modify the CPU fan speed to either enhance the heat dissipation or reduce the fan’s unnecessary noise and speed. Well, you can change your CPU fan speed in no time.
Changing the fan speed using BIOS settings is the easiest way to tweak the fan’s movements. Still, we have received several messages looking for how to change CPU fan speed without BIOS. Maybe because their PCs don’t have this option, or they just want some more reliable method to change the fan’s speed. Well, whatever the case is, we have written this post to help you know other methods to control the fan rotations. All you have to do is to read and follow this post until the end to know your answer.
Key Takeaways
- Changing the CPU fan speed without BIOS can help you optimize the cooling and noise level of your PC.
- You can use software tools such as Speed Fan, MSI Afterburner or HWMonitor to monitor and adjust the CPU fan speed.
- You can also use hardware devices such as fan controllers or rheostats to manually control the CPU fan speed.
- You should be careful not to set the CPU fan speed too low or too high, as it may damage your PC or cause overheating.
- You should test the CPU fan speed and temperature under different workloads and scenarios to find the optimal setting.
- How to Change CPU Fan Speed Without BIOS?
- Method 1: How to change CPU fan speed using software?
- Step 1: Download and Install the SpeedFan
- Step 2: Configure the Fan Control
- Step 3: Automatic Fan Control Set-up
- Method 2: How to Control CPU Fan Speed with External Fan Controller?
- Conclusion
- Frequently Asked Questions
How to Change CPU Fan Speed Without BIOS?
There are two effective ways that allow you to make changes and control CPU fan speed without using BIOS. Those methods include
- Fan Control Software
- External Fan Controller
Both are great in terms of their utilities, plus they have their own advantages. Let’s check each method in detail to know better about the query!
Method 1: How to change CPU fan speed using software?
Nowadays, you can find many fan control software to change the CPU fan speed and do several other operations as well. The famous ones include such as HWMonitor, Corsair Link, Argus Monitor, Notebook FanControl, and SpeedFan. But in this article, we will use SpeedFan software to demonstrate controlling the CPU fan’s speed using an application. For your information, Speedfan is a famous Windows-based Microsoft Windows software that is available for free. The program is made to monitor the temperature of components and the fan speed of the CPU.
You can manually adjust fan speed with this PC fan controller software if you want. Apart from this, you can also utilize its automatic features for fan speed. This feature automatically reads the components’ temperature and handles it along with fan speed according to the need. It might be a typical design since it looks typical, but it works fine. For setting up the software, one has to acquire proper knowledge, especially if they are a beginner. Follow each step given below to easily, precisely, and effectively control fan speed.
Step 1: Download and Install the SpeedFan
Go to the official website of SpeedFan. First, Download the software. When it is downloaded, start the installation process; once the application is installed in your windows, open it to scan the buses on the MOBO.
Step 2: Configure the Fan Control
Don’t attempt to change the fan speed with PWM when you open the application. Firstly, you need to configure it precisely.
- Step 1: You will see a suggestion for Configure; click on it.
- Step 2: Click the Advanced option that pops up on your screen afterward.
- Step 3: Locate the Chip given in the dropdown menu and open it.
- Step 4: Find the PWMs in the menu > Select your desired option from here.
Note: If you have no idea about the location of PWMs, click on all the chip dropdown items to find the appropriate option.
- Step 5: Once you have selected PWM, you will see the Set to the dropdown menu. All you have to do here is to choose the Manual or Software-controlled option.
- Step 6: After that, select Remember it to save the changes you just made.
- Step 7: Re-visit the main window > select the configured PWM out of PWM1, PWM2, PWM3, PWM4, or PWM5.
- Step 8: You can manually enter or toggle the buttons to tweak the CPU fan speed. Just do it and see its results.
Step 3: Automatic Fan Control Set-up
In the previous step, you learn how to change the fan speed manually. You need to set it up properly for an automatic fan speed control. So, it automatically increases CPU fan speed whenever a CPU gets overheated. In contrast to this, when it cools down once, it will automatically decrease the rate.
- Step 1: Click on Configure and then go to the Speeds tab.
Note: It’s helpful to determine your fans’ minimum and maximum range of RPM.
- Step 2: Set up the minimum and maximum RPM range from here.
- Step 3: After setting the RPM limits, go to the Fan Control tab to choose a suitable temperature curve.
Note: After setting the temperature range, now it’s time to examine its effects on the system. To review whether the changes are favorable or not, try to load some heavy apps.
- Step 4: Now, open the Temperature tab to set and determine when your CPU fan speed increases and decreases depending on the CPU/GPU temperature.
- Step 5: Select the determined sensor to control the fans in the temperature configuration menu under all the sensors.
Note: At the bottom of the screen, you find two choices: Warning and Desired.
- Step 6: Set both, Warning and Desired to their required amounts.
- Step 7: Select Apply and then Ok to save your changes.
After doing the above procedure, whenever your CPU/GPU reaches a defined temperature that you have set, it will automatically slow or fast the speed. That’s how you can use this Fan Control Software for PC fan setup.
Method 2: How to Control CPU Fan Speed with External Fan Controller?
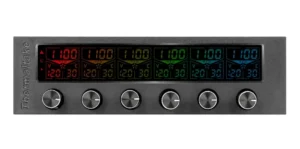
Another way to control the CPU fan speed is by using an external fan controller. By doing this, you can utilize the full power of the fans. Sadly, the Speedfan is incompatible with some motherboards, so you can consider an external fan controller such as Thermaltake Commander F6. The Commander 6 is an immensely popular external fan controller. It consists of three socket pins that enable it to control the six fans simultaneously. You get an RGB LCD, warning alarm, six temperature sensors, six control knobs, and short circuit protection.
Conclusion
A need to adjust the fan speed of the CPU can occur at any time. Nonetheless, it’s an essential thing for the health of PCs. That’s why it would be better if you already knew how to increase the fan speed when the CPU overheats with or without BIOS. BIOS often doesn’t work; therefore, we significantly mentioned two helpful ways to change fan speed without BIOS. You can either download and install software to control the CPU fan speed or use an external fan controller to supervise the CPU fan’s rotations without any issues.
Frequently Asked Questions
What is a good CPU fan Speed?
A CPU fan rotating at its 40-60% speed is considered pretty normal when using your PC to complete some day-to-day tasks like web browning. But the speed will definitely go up when you start playing games or doing content creation. Suppose your CPU’s temperature goes up to 60-70°C. In such a case, a CPU fan must be moving at its 100% speed or potential.
What causes a computer fan to run loud?
Most of the time, when the CPU’s fans start rotating at their full speeds, it’s obvious that they will produce serious noises. But suppose that the fans aren’t spinning at their full speeds, but you’re still hearing a louder noise. In such a case, there is a strong chance that the fans are dirty. You must clean the dirt from the fans, axles, and other parts around the fans.
Can you increase CPU fan speed?
The short answer is yes. You can tweak the CPU fan’s speed to utilize the true potential of the cooling system and cool your processor faster. There are most probably three methods to tweak the fan’s speeds. You can use the BIOS section in Windows and select the Fan Speed Control option to change the CPU fan. The other two are in this post so read them.

EDITOR
Arslan Ashraf is a dedicated tech writer with a rich background in Computer Science and five years of experience in the field. While pursuing his Bachelor's degree from Virtual University, he has honed his expertise in CPUs and CPU Coolers. His ability to simplify complex technological concepts has made him a valuable resource for a wide audience.

![What are CPU Cores? [All functions explained] 2024](https://www.ingameloop.com/wp-content/uploads/What-are-CPU-Cores-450x257.jpg.webp)
![Should I buy a tray Processor? [Explained with Pros & Cons]](https://www.ingameloop.com/wp-content/uploads/Should-i-buy-a-Tray-Processor-450x257.jpg.webp)
![Can you use 70 Isopropyl Alcohol to clean CPU? [Explained] 2024](https://www.ingameloop.com/wp-content/uploads/Can-you-use-70-Isopropyl-Alcohol-to-Clean-CPU-450x257.jpg.webp)
![How To Update CPU Drivers? [Windows 10 & 11]](https://www.ingameloop.com/wp-content/uploads/How-to-Update-CPU-Drivers-450x257.jpg.webp)